Around the World on Wednesday --Changing Seasons

The changing of seasons really is my favorite time of year! I love all of the colors that nature blesses us with, not to mention the gorgeous projects we can complete with all of our Stampin’ Up! products! For this month Around the World on Wednesday Hop, our theme is ‘changing seasons’. I created this fabulous scrapbook layout with some of my favorite things!

91442295_10216484369808661_2887014979863576576_n.jpg

I hope you enjoy this hop as you visit some amazing talented crafters from around the world. I love how everyone interprets our monthly themes! I know you will be inspired!

I love to scrapbook, especially anything to do with fall. When the leaves start to turn its absolutely gorgeous in Alberta as in many places in the world. These pictures are from 3 years ago already! I can’t believe how much my kids have changed in that time frame! Which is why I am so blessed to be able to capture our memories in a more permanent way.

final (12) 4.jpg

I started with a base of Rich Razzleberry and added some depth with my Blending Brushes and Blackberry Bliss ink. I also flicked my dark Black Stampin’ Blend marker over the blended area for another bit of texture. This is the easiest way to add interest to your backgrounds!

I focused on two die sets for this layout—Harvest Dies and the Beautiful Leaves Dies. Both of these dies have amazing images or shapes that don’t require any stamping! You can just simply cut them out to add as embellishments to your design.

The Blackberry Beauty DSP was the color inspiration for my page as I used both Rich Razzleberry and Blackberry Bliss, Cinnamon Cider, Kraft paper, Gold Shimmer Vellum and Very Vanilla as my colors, with the sentiments all stamped in Soft Suede.

final (9) 4.jpg

For the left hand side of my scrapbook page (yes, I actually design left to right!) I added two strips of the amazing Blackberry Beauty DSP—this specialty paper has gold foil inlaid in the design. It is so rich and luscious! My photo matte is Very Vanilla and I love to have the strips and my photo offset. Nothing is square!

I cut the large leaf shape from the Beautiful Leaves Dies out of Blackberry cardstock and then cut it vertically in half. This allowed me to use some on top left and bottom right corner of my photomat. Because our eyes move left to right I tend to have a little vignette at the top of the left and at the bottom of the right on this page of my double spread.

The two thistle shapes are cut from the Kraft 6x6 stack and the wheat is cut from the Gold Shimmer Vellum! I love to layer all of these shapes together to form a bouquet of sorts!

The sentiment “Enjoy the Little Things” Is from a retired stamp set, but its the perfect phrase and size so it is one that I still keep hanging around! The other phrase on this page, “Love is What Makes us Family” is from Lovely You. I love the mix of fonts in this stamp set!

final (10) 5.jpg

On the right hand side of my scrapbook layout, I wanted to be able to include two 4x6 photos. The photo mats are Soft Suede and once again nothing is square. These pages are actually two pages that my Scrapbook Group members made this month as well. I find be eliminating things being perfect, hence adding things on an angle, it takes away the stress of having to have everything perfectly aligned! Because my eye was just on the bottom right corner of my previous page, it kept the eye moving across to this page by having a vignette in the bottom left and then naturally up at the top right. These are aspects I consider when designing my scrapbook pages. I hope this is a helpful tip!

Many of the same elements are also carried through on this page, however I did add a couple small individual leaves from the Beautiful Leaves Die cut from the Kraft paper. Both pages have some Champagne Rhinestones, they coordinate so beautifully with this suite!

“You make the ordinary extraordinary” is from the Simply Succulents stamp set and “Love You More” is from Measure of Love.

I love how these pages turned out! If you live in Canada and are interested in scrapbooking, please reach out to me!

Now onto the HOP! You can keep hoping to Tricia Butts an amazing crafter from the United States!


Color Fusers--September Blog Hop

Well hello there! It has been a hot minute…and I am happy to say that I am back! I took a little blog siesta to enjoy the summer and work on some other things! So I am happy to be back especially with the Color Fusers as I absolutely LOVE this monthly creative challenge. I am always excited to try and created with different color combos as I find I do tend to get stuck in a rut sometime. This month our challenge was to use Basic White, Basic Black and a color of our choice…immediately I thought of Halloween! How can you not? It is the best holiday ever!

color fusers september.jpeg
Are you someone who gives crafty gifts at Halloween? I love a good reason to give candy and my kids teachers definitely have been spoiled over the years with some fun gifts! What I am loving this season—these Kraft Gift Boxes!

Are you someone who gives crafty gifts at Halloween? I love a good reason to give candy and my kids teachers definitely have been spoiled over the years with some fun gifts! What I am loving this season—these Kraft Gift Boxes!

So I may have cheated a little bit by using this Kraft Gift Box for my project…but really, its a non color? Haha, and I really focused on Basic Black for that spooky Halloween feel. I left my Basic White minimal and only added in some Pumpkin Pie cardstock to die cut my pumpkin.

final (10) 3.jpg

If you haven’t assembled a Kraft Gift Box yet, it does come with some pre-sticky tabs, however I always want to keep a box reusable in a sense. By creating a belly band for your box it means you don’t have to add any permanent adhesive to your project. And who can resist a sparkly belly band!

I cut a 2 x 12 inch strip of the Black 12x12 Glitter Paper and shaped it around the box. I also don’t want this to be permanently glued to the Kraft Gift Box so I cut a long length of the Crinkled Seam Binding Ribbon. Using my Black Stampin’ Blend I colored the ribbon. I honestly hope this ribbon never retires as it really like having access to all of our colors as you can customize it using our Stampin’ Blends, a Stampin’ Write Marker or even with a Blending Brush and an ink pad! Its fabulous!

I die cut two black wreaths using the Seasonal Swirls Dies and off set them from each other using Glue Dots. The pumpkin is die cut from the Detailed Pumpkins Die and added on with a Dimensional. The sentiment is from the Sparkle of the Season stamp set but is cut with a label die from the Frightful Tags Dies.

final (13) 2.jpg

I am absolutely loving the Frightful Tags Dies, in fact, I don’t even bother putting them away as I keep reaching for them! The spider web is the perfect Halloween image and I have been using it on so many things already! In this case I decided to cut one in half and use each half to peek out at the top and the bottom of the project. I thought it was a really fun edition to this!

Now here is the real question…who actually eats Candy Corn? I mean, enough people must that they keep making it every year! Haha! I thought it was a fun filler for this Kraft Gift Box AND it matched my color scheme!

I am super curious to see how the rest of the team used this color combo! I am always so inspired by what everyone makes!

September Class to Go Kit!

Hello friends! Wow, what a summer right? Its officially fall, Pumpkin Spice season, sweater weather, and my favorite time of year for crafting! I don’t know why, but I just love the colors of fall, they feel cozy and like home. I grew up on the prairies and fall is absolutely gorgeous. I got married in September and the leaves had started turning but the weather was still warm!

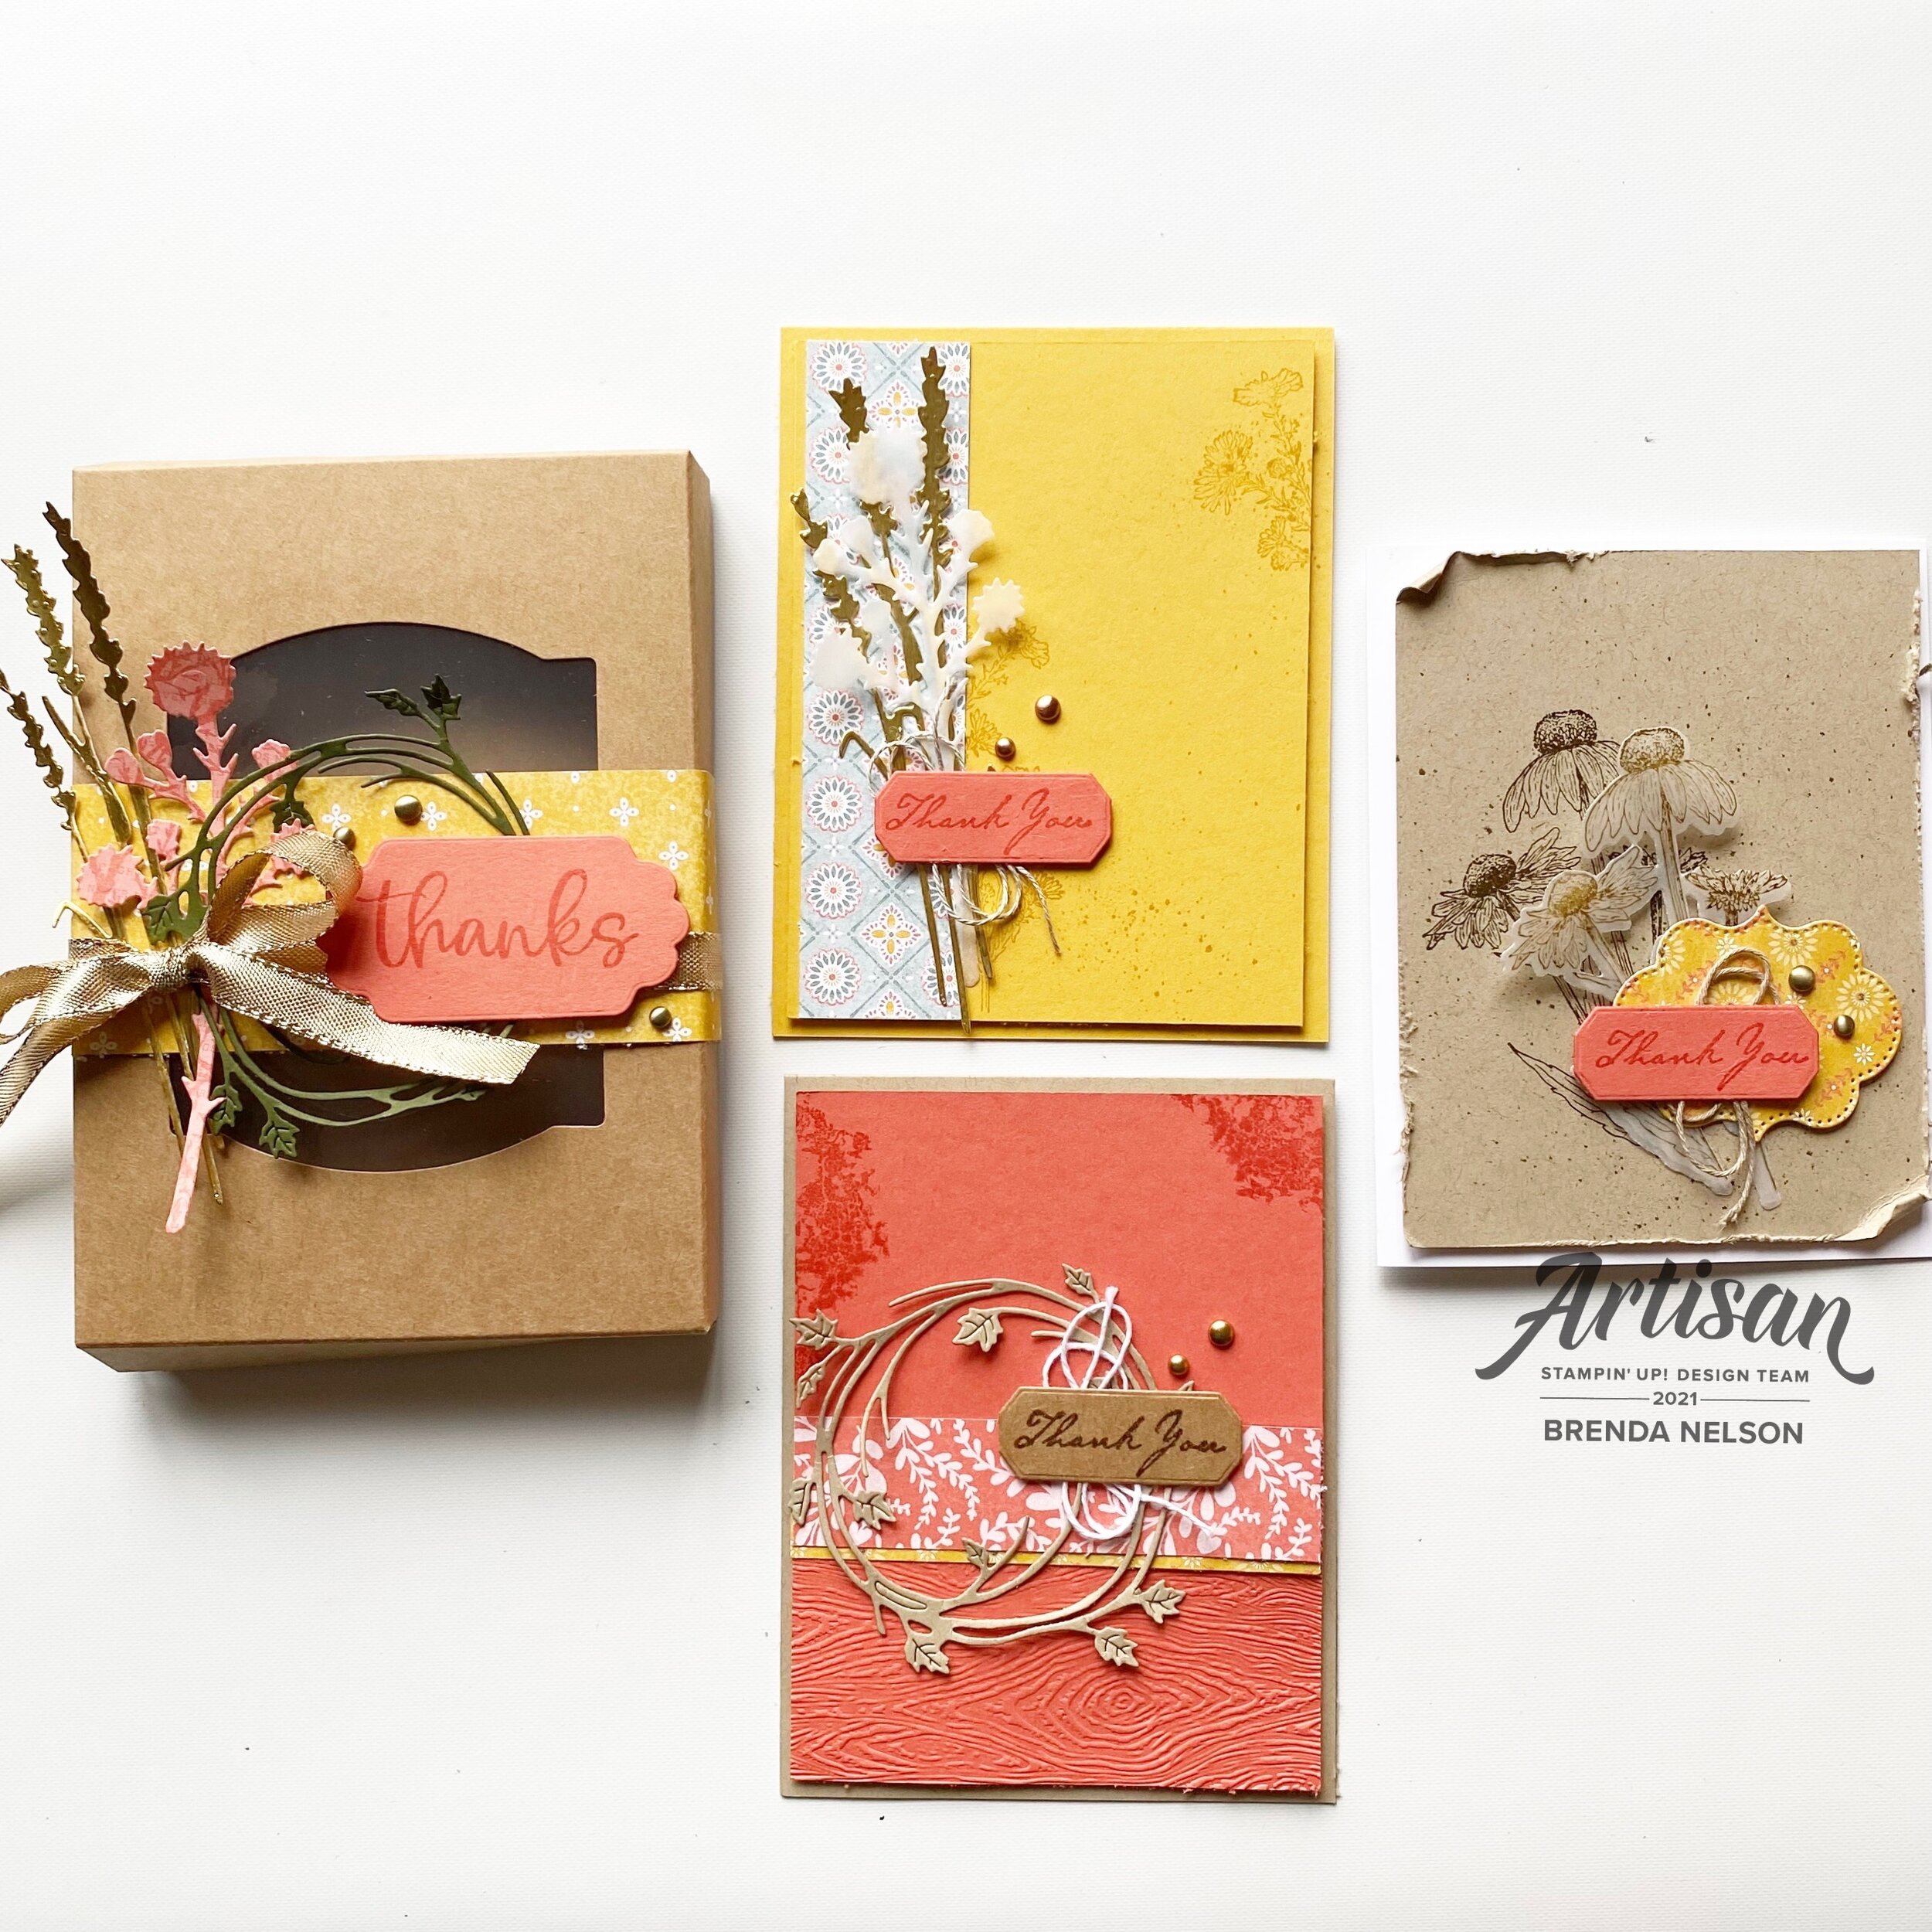
I think all of these things helped to inspire this September Class to Go Kit featuring the Harvest Meadow Bundle found on page 54-55 of the Holiday JJ 2021 Catalogue. This gorgeous Thank You card project features fantastic embellishments such as vellum, Gold Foil paper and Metallic Dots. It is a perfect gift to give or to have waiting at your Thanksgiving table!

final (13) 3.jpg

Historically my Class to Go Kits have only included a written tutorial with photos, however, in the spirit of trying something NEW I am going to make a video of how to assemble these gorgeous projects as well! SO you will get both options with all 3 registration options. Only 3 ink pad colors are required to make these amazing cards—Calypso Coral, Bumblebee and Soft Suede!

Option 1: Stamp Set Only $39. This option includes the Nature’s Harvest stamp set and supplies to create 2 of each card shown, for a total of 6 cards. You will receive all of the die cut pieces and embellishments

Option 2: Bundle (stamp set and Harvest Dies) for $82. You will receive all of the card making supplies PLUS the Kraft Gift Box and products to make the belly band! This is an amazing add on value!

Option 3: Kit Only $25. This option includes only the materials you will need to create the cards and the Kraft Gift Box.

final (10) 4.jpg

As you can see this is a gorgeous Thank You card project. The design of the cards provides you with inspiration for further crafting projects and the Kraft Gift Box has become one of my favorite projects as you will see over the month with some other projects being shared on my social channels!

I can ship this kit for a nominal expense anywhere in Canada or you can partake in local pick up! Please bear with me as I am working to get my website more order efficient. In the meantime, leave me a comment or click on SIGN UP NOW and I will reach out to you with payment arrangements. You can message me on Instagram @stampwithbrenda or by email at bsparkles@me.com as well!

Around the World on Wednesday--Let's Shake Things Up!

Our theme this month is NOT a shaker card, well it could be, but it is really to shake up your creativity by creating something new with a technique or such that you have not tried in the past. This was the perfect time for me to experiment with the Alcohol Stampin’ Blends technique that is super popular!

91442295_10216484369808661_2887014979863576576_n.jpg

I want to thank my friend Alanna Wharf as she shared how to create this technique during a recent Summer Stamp Camp that I was co-hosting and it inspired me to try it out! I wanted to use this Blends technique on a holiday card—tis’ the season! Okay, well it is still summer but you can never be too ahead for the holidays!

final (31).jpg

The base of my card is on Shimmery White and you must use Vellum to create this alcohol Blends technique. You also need a Stampin’ Blend in a color (s) of your choice, in my case I used Light Cherry Cobbler, and some Isopropyl Alcohol (or Rubbing Alcohol). I used an old Aqua Painter (I knew I kept those for some reason, haha!) to apply drops of the Isopropyl Alcohol. The internet is full of a ton of videos (not my specialty) on how you can execute this technique. It is surprisingly easy!

I created my little area and then cut the star shape from the Seasonal Swirls Dies in Cherry Cobbler card stock. I added some yellow stars from the Jolly Felt and Christmas Cheer Dies. I was so happy that felt returned to the Holiday Catalogue this year again!

“Jingle” is from the Holly Jolly Wishes stamp set—this is a fantastic stamp set full of holiday greetings!

Here is a close up of how fun this technique looks like.  I will definitely be experimenting with this technique again!

Here is a close up of how fun this technique looks like. I will definitely be experimenting with this technique again!

I wanted to create another fun little area at the top of my card and one of my favorite little dies as the moment is the ‘ticket’ die from the Bloom Dies in the Annual Catalogue. I used it to cut some of the Sweet Stockings DSP and then trimmed the ticket down in size. I found “Happy Christmas” in the Words of Cheer stamp set.

Another little felt star and some Matte Decorative Dots completed this fun little area!

Another little felt star and some Matte Decorative Dots completed this fun little area!

I don’t typically add anything to the insides of my cards, but I thought it would be fun in this case to add the complete ‘Jingle’ phrase and another star die cut.

final (32).jpg

I can’t wait to see what the rest of the Around the World Design Team creates based on this theme! I love how you can ‘Hop’ all over the world to see everyone’s unique styles! I live in Edmonton, Alberta, Canada! Tricia Butts is up next and resides in the United States. Click on the button below to hop to her page!


Color Fusers--August Blog Hop!

IMG_0110.jpg

Hello friends and welcome to another fun hope featuring the Color Fusers Design team and this awesome color combo! I really love purples and Just Jade has been permanently living on my craft table lately so I was super excited to create something with these four colors!

final 13.jpg

This card is all about the layers beginning with a base of Basic Grey! I cut a base layer out of Basic Grey as well and stamped some little flowers from the In Bloom stamp set in Basic Grey ink. A great tip for background stamping is to add all of the images , in this case little bitty flowers, on the block at once! It is a great time saver!

final 14.jpg

This card is an eclectic mix of items from the Annual Catalogue, the July-January Holiday Catty and Sale-a-bration! I just couldn’t resist using a little bit of something from all three of our publications!

The next layer on top of the Basic Grey is some Just Jade DSP from the Penguin Playmates collection in the Sale a bration catalogue. Off set to that I added some Basic White card stock that I ran through the new Timber 3D Embossing Folder from the July-January Catty and lastly, the Highland Heather DSP print is from the Hand-Penned collection.

final 10.jpg
 

Have you ordered this new Highland Heather 1/2 Grosgrain Ribbon yet? If not add it to your cart now! I love the shimmer to this ribbon and its easy to fold and tie and was the perfect add on behind the sentiment “Congrats You’re so Fancy Now”.

I die cut flowers from the Pierced Blooms dies in Gorgeous Grape and Highland Heather. A few of the purple toned pearls from the Pastel Pearls were an awesome finishing touch!

I also die cut some leaves for a little more Just Jade using the In Symmetry DSP and the Pierced Blooms dies.

final 8.jpg

I hope this card inspires you to play around with this fun color combo. If you look through our many fantastic Designer Series Papers you will see how many awesome options you have to create with!

Up next on the Hop is Melanie! I love her style and am always inspired by her creations! You can visit her next by clicking on the button below!

If you are just joining in her too you can always go back and see what Bonnie has designed as well! Either way, make sure you go all the way around our Design Team!