Create with Connie and Mary--Borders and Tags!
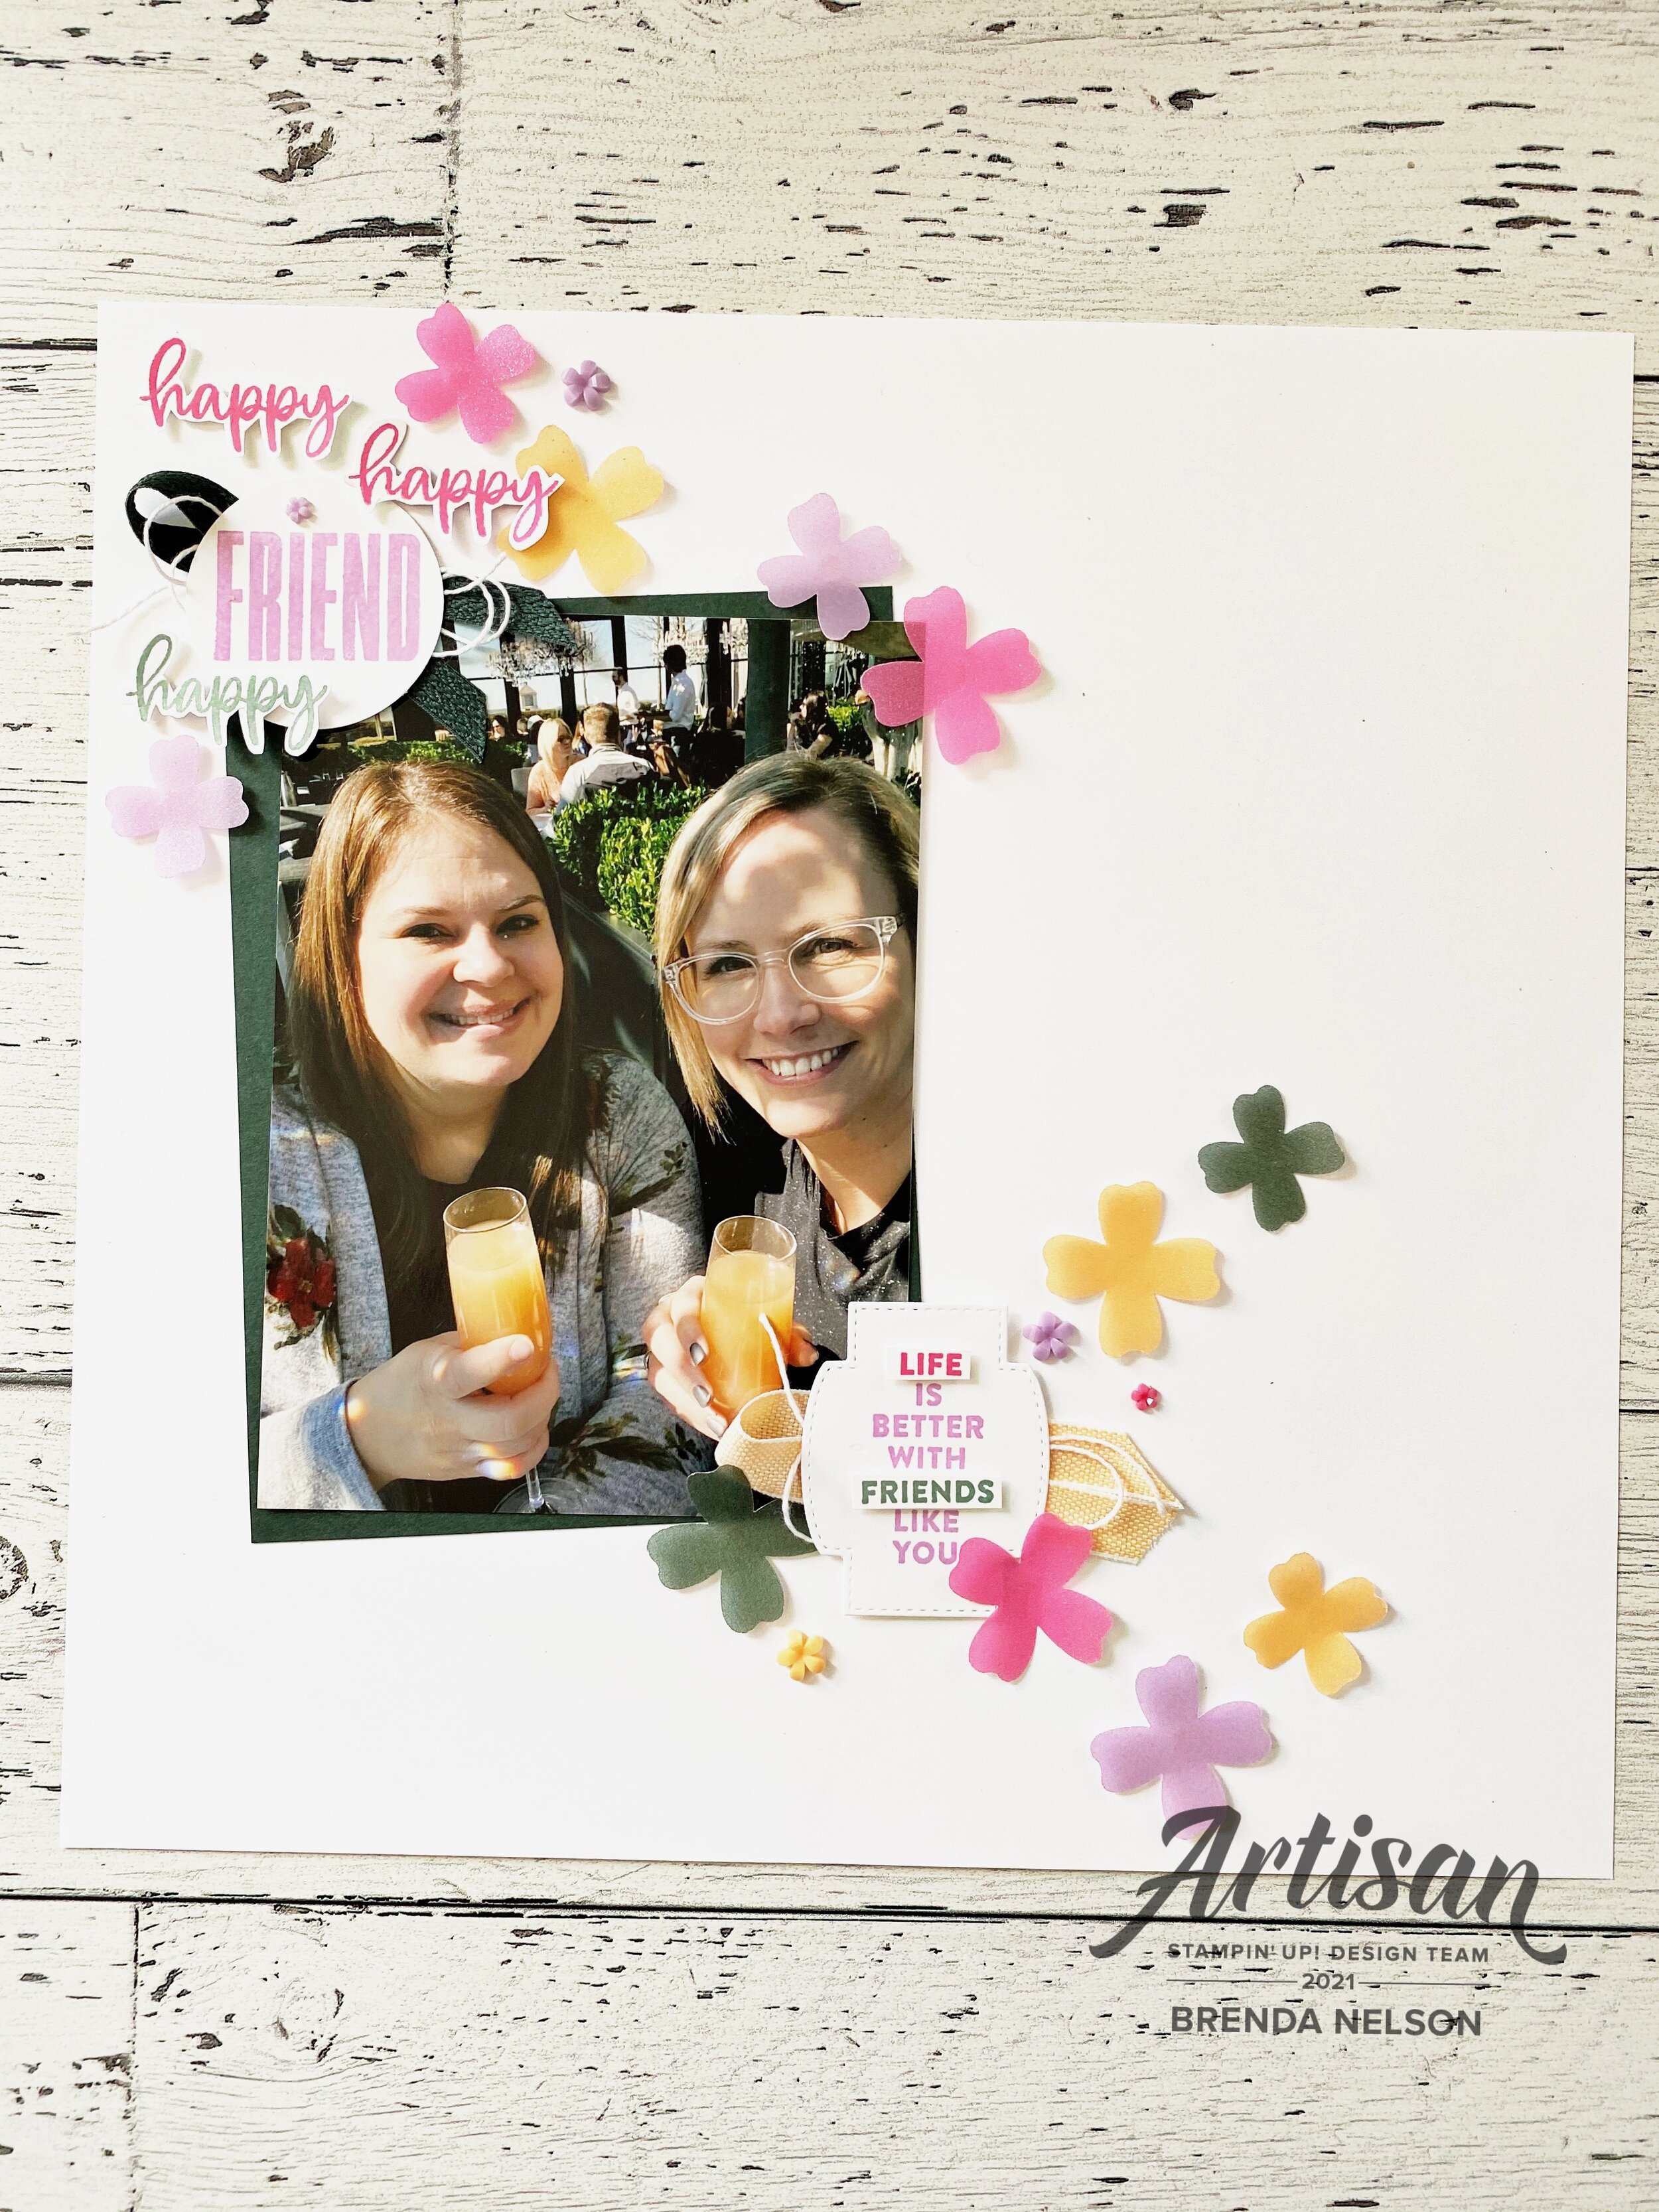
Hello and happy Saturday (orr whichever weekday it is when you are reading this!) and welcome to this weeks Hop! Our theme is borders and tags…so I used tags to make a fun border on a scrapbook page! I am absolutely in love with the new Tailor Made Tags dies (in fact they have become a permanent friend beside my Stampin’ Cut & Emboss Machine) and I think I have used them in a unique way!

21SUSatHopWelcome.png

As soon as I saw this design theme I knew I wanted to create a ‘border’ using ‘tags’…and with Father’s Day coming up I couldn’t resist the idea of creating yet another Father’s Day page. I have started a scrapbook gallery here on my blog so feel free to check it out if scrapbooking is your jam!

final (4) 22.jpg

I started my page on a base of Basic White because I knew I wanted the ‘tags’ to really pop off the page and I added a layer of Basic White over top that I trimmed to 9x12. I wanted to be able to slip my tags underneath this piece.

I chose the colors of Calypso Coral, Crumb Cake, So Saffron, Soft Succulent and Night of Navy to cut the largest tag from the die set.

I was also intrigued by the Hats off Bundle to create something without the ‘hat’ and I found this bundle has some really really awesome sentiments! I am so happy that I recently ordered this set as it really made this page come alive. I wanted everything to feel crisp so I did all of my stamping on Basic White.

final (19).jpg
 

Because the focus of this design challenge was on borders and tags which I nailed with the border of tags, I wanted to make sure that I had a few ‘tags’ on my layout too.

For the top of the page I cut a mid sized tag from Soft Succulent and then I stamped the phrase “You’re the Best” and layered it over the tag for a bit of a different look.

final 80.jpg

It is easy to chance up the look of your stamps by eliminating certain things—-for example the outline on the #1. I also like to keep some shapes flat to the page and pop some up on Dimensionals for a little bit of interest. I also love that this is just a ‘DAD’ page so it doesn’t have to be Father’s Day or a birthday, it’s just a great page to celebrate dad.

I am excited to see what the rest of the team comes up with this week! You can go BACK to see what Melissa has created or NEXT to see what Connie has made. And remember to check out my scrapbook gallery or previous blog posts for more memory keeping inspiration.

Scalloped Sunshine Box

Hello friends! I am so excited about this cute little project that I created to share with members of my Glitter Girls team at our monthly team meeting. When our team reaches 10,000 CSV I reward everyone with a fun gift. Since the Pale Papaya & White ribbon is one of my new favorites I thought I would treat everyone with something that I love in hopes they will too.

final (17).jpg
 

This cute little sunshine is stamped with Daffodil Delight ink and can be found in the Sharing Sunshine stamp set. The center is actually its own stamp and makes really great polkadots!

To stamp the ‘rays’ , I stamped it once full strength and then rotated it slightly and stamped again to get that two tone yellow.

The cheeks are stamped in Magenta Madness for a real pop!

The sentiment is from the Sweet Strawberry stamp set and I added some of the new Just Jade and Gold Ribbon behind the sun with some of the recent Butterfly Bijou DSP.

You can see how I used the center of the sun to create a sunny polkadot base for the box on Daffodil Delight card stock. I love that these Scalloped Treat Boxes can hold a roll of ribbon!

You can see how I used the center of the sun to create a sunny polkadot base for the box on Daffodil Delight card stock. I love that these Scalloped Treat Boxes can hold a roll of ribbon!

final (14).jpg

Of course I also had to make a cute tag to go ON the roll of ribbon because you know, CRAFTERS GONNA CRAFT!! This cute tag is made using the Tailored Made Tags Dies and the Handmade for You stamp set.

And since I decorated the bottom of the box I needed to decorate the inside of the lid too with an inspiring message!

I really fell in love with this BRIGHT color combination of Magenta Madness, Daffodil Delight and Just Jade!

I really fell in love with this BRIGHT color combination of Magenta Madness, Daffodil Delight and Just Jade!

The sentiment, You Are Amazing, is from the stamp set of the same name and it is stamped with Just Jade ink and punched out with a retired punch. Behind it is stamped another shape from Sharing Sunshine stamp set.

I just love these fun boxes and I have so many ideas on what I can fill them with! I hope you are inspired to add them to your cart! You can hit the SHOP WITH ME button to go directly to my store or use my HOST Code shared on the side bar. Either way, if you do place an order with me thank you in advance and you are helping me get one step closer to my goal!

Create with Connie and Mary--Glitz and Glam

Hello, welcome to the blog hop this week. Our theme is “Glitz and Glam” which can mean so many things! I associate it gold and lots of layers and interest!

21SUSatHopWelcome.png

I think the Expressions in Ink suite is pretty damn GLAM and its also super unique to Stampin’ Up! so I knew I wanted to do some creating with it. I designed 3 projects for my monthly Class to Go Kit which I will share in a a separate post. Here is a little teaser for you though!

final 77.jpg

I started with a Basic White card base and added a layer of this awesome gold strip paper from the Expressions in Ink Specialty DSP. I used the Layering Circles dies to cut a circle or window. In behind this I layered the fantastic floral die that is a party of the Artistic Dies.

The Artistic Dies also have this large leaf die that I cut out of Just Jade ink and trimmed and placed around the big Polished Pink stamped floral.

I used the coordinating Ephemera Package to add in some glitz with the gold leaves and sprig and the iridescent sequins scattered around.

I think this card definitely has a ‘glam’ feel to it, don’t you?

Let’s see what the other team members have created this week. You can go back to see Melissa or next to see Connie! And watch for another post with all of my Class to Go Details!

Around the World on Wednesday--Step it Up!

Welcome to another Around the World on Wednesday Blog Hop! This is literally the only way you can actually go ‘around the world’ in these fun and interesting times, hahaha! So I am happy to have you here!

I loved this months theme as its always a good challenge for me to try a fancier fold card style from time to time and that was how interpreted the theme of ‘step it up’! I can’t wait to see what all of the other gals from around the world design!

137064325_10218496422788728_249469279951355940_n.jpg

I wanted to play with the Sweet as a Peach stamp set as I haven’t had a chance to ink it up yet and I knew it would be a good option for the card style I had in mind. I had a request from a stamping friend to show her how to make a waterfall card and it worked out perfectly for this monthly challenge!

The Waterfall card style is an oldie but a goodie! And the best part is that is not complicated to make but look super fancy and is sure to get a ‘wow’ reaction from the recipient!

The Waterfall card style is an oldie but a goodie! And the best part is that is not complicated to make but look super fancy and is sure to get a ‘wow’ reaction from the recipient!

To create this style of card you need to choose a stamp set (or multiple sets) that has a lot of imagery and or sentiments for the 4 flip panels or the ‘waterfall’ aspect. I decided to use Sweet as a Peach because it has 12 words or sentiments in the stamp set and I wanted to layer up the peach and floral images with sentiments.

I decided to stick with the color palette of the You’re a Peach DSP therefore the base of my card is Crumb Cake with accents of Early Espresso.

To create the two tones of the peach I stamped it in Pale Papaya and then used my Blending Brush in Calypso Coral ink to add a deeper color straight to the stamp. Because these white squares are not that large, I used a couple of the leaves from the bottom of the big leaf stem on these peaches. The inside peach uses the larger leaf included in the set.

pictapgo-output 3.jpg

I also applied the same concept to stamp out the trio of flowers—stamping it in Pale Papaya first with the Calypso Coral added with a Blending Brush. I stamped all of the sentiments in Early Espresso ink.

On all 3 of the peaches I also added a bit of Wink of Stella for a little glimmer. Sadly it is really hard to photograph but looks really great IRL (in real life, yes I had to ask one of my kids once what that mean when they sent it in a text!!!).

final (4) 15.jpg

I added the polka dot pattern from the You’re a Peach DSP straight to the card base and added a few Champagne Rhinestones to the peach images.

pictapgo-output (2) 2.jpg

I punched a hole at the bottom of the waterfall piece to thread some of the new Pale Papaya & White ribbon through that I tied with a Linen Thread bow. This also helps the recipient know to pull on this piece when they receive their card.

And I also wanted to stamp the inside for a bit of extra fun!

 
91442295_10216484369808661_2887014979863576576_n.jpg

I hope this waterfall card design sparks an interest for you to try your own! I have included the instructions below and trust me, its easy!

pictapgo-output 5.jpg

To Create a Waterfall card:

Cut standard card base @ 81⁄2’ x 51⁄2” and standard mat @ 51⁄2" x 41⁄4”. Cut one “Anchor Strip” out of cardstock @1” X 4.” Cut one “Movable Strip” out of cardstock @ 2” x 9.” Cut 4 dark squares @ 2” and 4 whisper white (light) squares @ 13⁄4”.

  1. Lay the cardstock “Movable Strip” on scoreboard in landscape position and score this 4 times @ 2", 2 3⁄4", 3 1⁄2", and 4 1⁄4". Fold all score lines in the same direction and burnish with bone folder. 


  2. Apply adhesive to both ends of the “Anchor Strip” - only 1⁄2” on each side leaving centre part free. Attach this to the mat piece. Then add the mat piece to the card base front.

  3. Lay “Movable Strip” on card so that the folded parts are on top of the “Anchor Strip” and the unscored part is behind it. Adhere only the top end (1⁄2”) to the ‘Anchor Strip” This is so the parts can move freely. 


  4. Stamp images onto small white squares. Colour stamped images. Adhere to the 2” dark squares. Attach squares to the “movable strip” starting with the bottom one. NOTE- use only thin strip of adhesive along the top of each square for the top 3 squares - they need to be able to flex - fully attach the bottom square at top and bottom.

  5. Punch hole at bottom of under piece of the Movable Strip - then thread ribbon through and tie with a bow.

Thank you to my awesome friend Hetty for these directions! She is a library full of fun folds and is always willing to supply me with measurements when I need them! You can follow her on Instagram @stampin911hq!

Following me on the hop is Tricia Butts from the United States and if you didn’t know where in the world you are right now, I live in Edmonton, Alberta Canada! Please feel free to leave a comment and make sure to visit us again next month!


Color Fusers--June 2021 Blog Hop

Hello friends! Welcome back to another fun blog hop featuring the new amazing In Colors 2021-2023. Now, I have been stamping with Stampin’ Up! for a quite a while, coming on 15 years actually! And I have to say that this new lineup of colors is probably some of my all time favorites. Remember that year they released Coastal Cabana…me neither but its probably at the top and this new collection just might kick it out of first place!

June 2021.jpg

If you are a total newbie to Stampin’ Up! then this might be one of your first peeks at these colors or experience with the In Color collections. If you are a seasoned stamper than you have been seeing this colors ALL OVER THE PLACE because demonstrators like myself, cannot get enough!

I wanted to make a scrapbook page and showcase these colors with another new amazing product— the Shimmer Vellum. Now this ain’t your regular old vellum friends, this is shimmery and awesome in all the right ways and it comes in 12x12! Yay! You can expect to see me using this alot during this catalogue period.

This is my awesome friend Jessica and I on our last girls trip together in March of 2020! Look at us, so smiley and happy.  The day after this trip ended to Ohio—guess what happened? Covid.

This is my awesome friend Jessica and I on our last girls trip together in March of 2020! Look at us, so smiley and happy. The day after this trip ended to Ohio—guess what happened? Covid.

I used the Flowers of Friendship bundle and the Biggest Wish stamp set as the features on this layout. The crisp Basic White base really helped these flowers pop right off of the page. Now vellum can be tricky to adhere because you can usually see the adhesive through the vellum, but would you believe there is a Mini Dimensional behind these flowers? This vellum is just thick enough they disappear on the white page base.

final (4) 4.jpg

One of my favorite new embellishments are the Loose Flower Flourishes which I have also added onto this page as they are available in Pale Papaya, Polished Pink and Fresh Freesia. They work so well with the Flowers of Friendship bundle too as the flowers have a similar look to them. And they are a flat backed embellishmentt so they attach easily with a Glue Dot.

I stamped out the sentiment in Fresh Freesia and die cut it with a shape from the Stitched So Sweetly Dies. I then stamped it again in Polished Pink and Soft Succulent so I could trim out a couple of the words to pop up on a Mini Dimensional.

I added some of the new Pale Papaya & White ribbon behind the sentiment with some white twine. I can’t help myself, I love my embellishments and almost always had some ribbon or twine, or both, behind my sentiments.

final (7) 3.jpg

I wanted to incorporate the Biggest Wish stamp set into this page as I loved the fact that it had the word Friend in it. I am always on the lookout for that. I stamped it with Fresh Freesia and punched it into a circle. I used one of the mini flower embellishments for the dot of the ‘i’.

Behind the ‘Friend’ I added the new Evening Evergreen 3/8 Chevron Weave ribbon which is so nice in person! And of course a little more white twine.

I stamped ‘happy’ twice in Polished Pink and once in Soft Succulent and hand trimmed them out to add to the page with a Mini Dimensional. How did we survive before Mini Dimensionals…these are the thoughts that keep me awake at night! hahaha!

I hope this page inspires you and if you have not added the Shimmer Vellum to your cart than do so! You can shop with me by clicking the Hostess Code link on the side of my page.

I can’t wait to see what the rest of the team creates with these fantastic new In Colors! You can hop NEXT to see what Melanie has designed for us!

Or if you want to head backwards you can do that too! Either way go all the way around so you don’t miss any awesome inspiration. By clicking Previous you will be heading to visit Bonnie! Have a lovely June and we will see you back again in July!