Artisan Design Team Project--Marigold Moments Bundle

Hello friends! This month my Artisan Group consisting of Tammy Wilson, Heather Thomas, Sandra Herzog, Karine Lison and myself where given the Marigold Moments bundle to design with. I actually quite enjoyed this bundle as it has some really amazing elements!

I am really going to miss these embossed treat bags! they were so easy to create with!

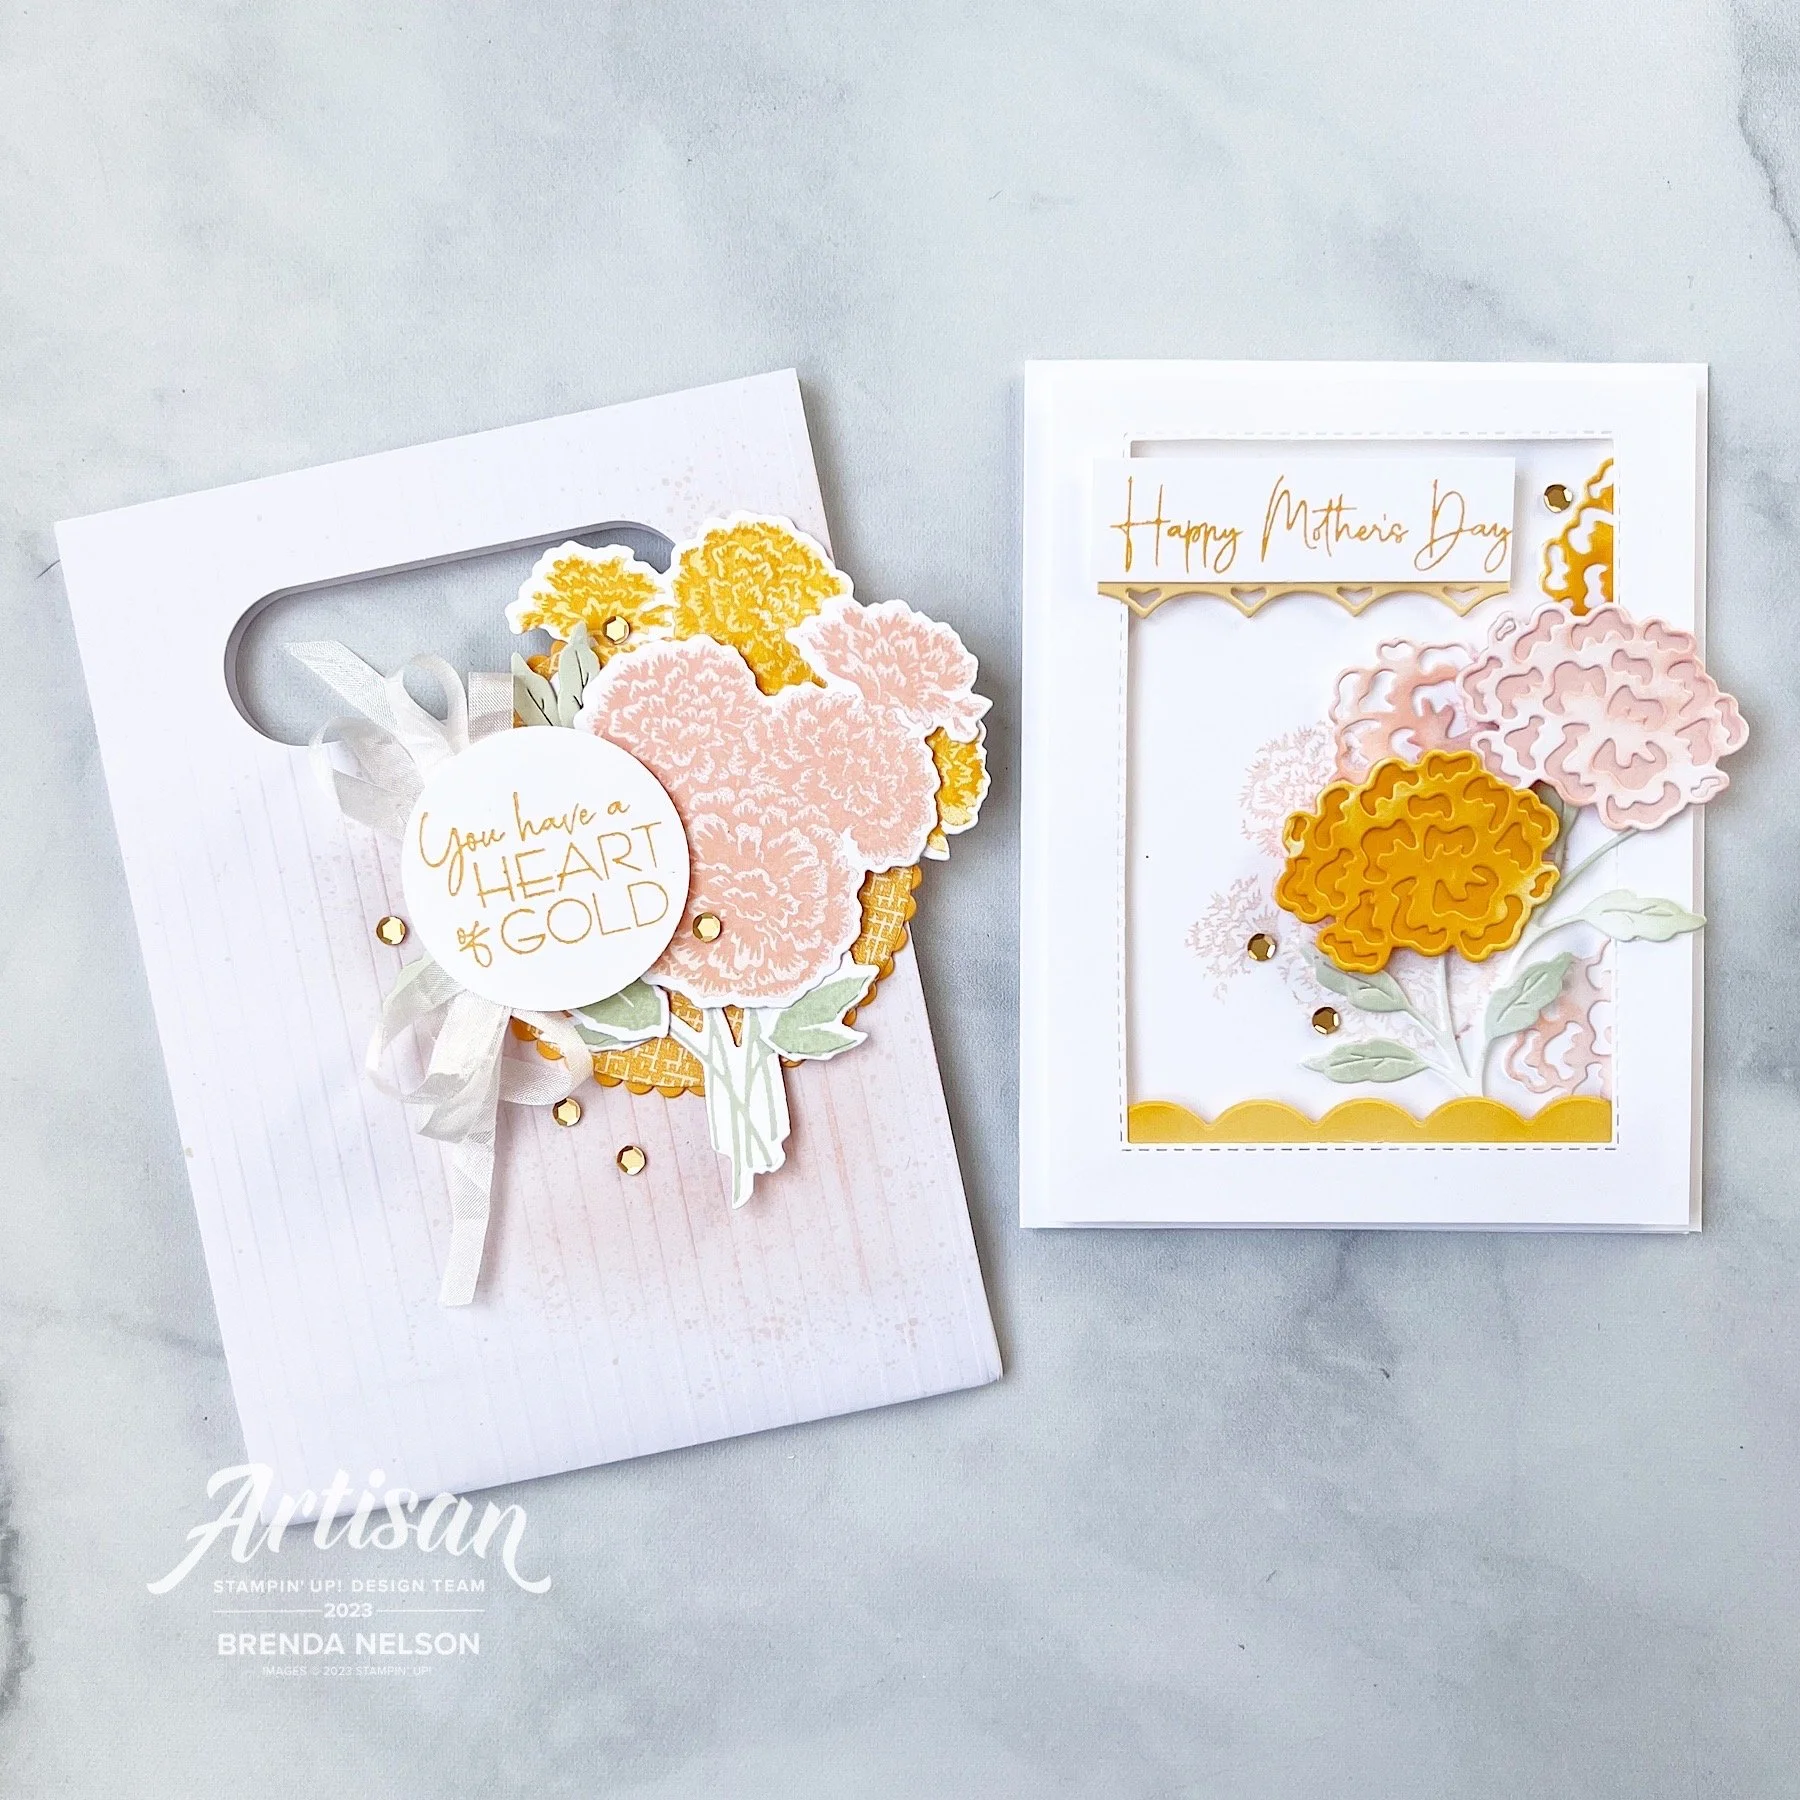
I decided to make a card and coordinating treat bag for my projects this month. You can give these together or individually! Let’s start with the Embossed Treat Bag—I used my Blending Brush in Blushing Bride to give a bit of color to the right side of the bag and then I flicked my Stampin’ Write marker over top as I do love the splatter look.

I cut a large scallop circle from the Layering Circle Dies and then a circle of DSP from the Regency Park DSP to go on top. The marigold cluster was stamped in Blushing Bride and Mango Melody ink and die cut. All of the greenery is either stamped or die cut from Soft Seafoam ink.

I actually LOVED this color combination and am sad to see both Blushing Bride and Mango Melody retire. I had alot of fun creating with them over the years.

The sentiment “You have a Heart of Gold” is absolutely AWESOME and one that I don’t recall ever seeing in any other stamp sets before. I added a double bow behind it in the Crinkled Seam Binding Ribbon, another LOVE that is retiring. And lastly to play off of the sentiment I added some gold sequins from the Adhesive Backed Pastel Sequins.

To all of the moms out there…you are killin’ it. have an awesome mother’s day!

This card is quite fun as its a shakerless shaker card, hahaha! I cut a window out of my first layer of Basic White card stock using the Stitched Rectangle Dies and after I stamped the cluster of marigold flowers on the card base in Blushing Bride, I added this window layer with the Adhesive Strips.

TOP TIP: Use Adhesive Strips instead of Dimensionals to get a little more lift. They are thicker and so easy to run around the edges of your shape as you can cut them to any length you like!

The Marigold Moments Dies have a really awesome border die that cuts out the scallop that I tucked along the inside bottom of the card and the reverse image underneath the sentiment. I love that this stamp set includes a Happy Mother’s Day stamp,

There are two dies used to create one of these marigold flowers and one for the stem. For the base of the flowers I die cut the solid back in Mango Melody and Blushing Bride. The top die cut layer and the stamps are cut out of Basic White and then I used my Blending Brushes to add some color. I love this look because it adds so much texture and depth. The idea is NOT to make the Basic White base look like card stock but to allow for color variation. I added a few extra flowers tucked in and behind my main blooms to help give the illusion of a bouquet.

And of course I had to add some gold sequins. Every project needs a little bling right?

I hope these projects inspire you and please make sure to check out what the rest of my group has created on either the Stampin’ Up! Official Instagram page or their individual pages:

Tammy @stampspaperscissors

Sandra @herzerlskreativecke

Heather @thesongbirdstamper

Karine @karinelison73choupinette

Thanks friends and see you again soon!

Here is a supply list of what was used to create these projects. If they have inspired you, please consider shopping with me so I can continue to do what I love!

Artisan Design Team--Recency Park Suite Project

Hello friends! I cannot express how excited and happy I am to be on the Artisan Design Team again for 2023. This really is a dream opportunity and I love the creative challenges each month.


The Artisan Team is split up into 4 groups and we are each given different assignments to create some truly awesome projects with to share with the Stampin’ community throughout each month.

My group is myself, Heather Thomas, Karine Lison, Sandra Herzog and Tammy Wilson!

Our assignment this month was to create with the Regency Park Suite and I could not love it more if I tried! The Petal Park punch bundle and the Sentimental Park die bundle are so fantastic and compliment each other so well. And all the add ons like the Textured Shimmer Paper and Recency Park 6x6 Paper are top notch!

I knew that I wanted to create a scrapbook page featuring my sons grade 12 grad because our family pictures were the perfect color palette for this suite. It honestly came together so easily using Night of Nave 12x12 for the background and then layering on some DSP and a big awesome photo mat of the Textured Shimmer Paper.

I used a 6x12 piece of Basic White card stock to tone down the blue a bit and to help all of the amazing flowers and the sentiment pop. I kept to the color palette of the DSP—Balmy Blue, Mango Melody, Petal Pink and Shaded Spruce. I did lots of stamping off so that the filler portion of the flowers was always a shade lighter.

This picture really shows off the Textured Shimmer paper and some of the gorgeous little flower dies from the Sentimental Park Dies. You can also see that I added some of the Adhesive-Backed Milky Dots as well to my project.


One of the best tips I learned from Tammy Wilson when we were on the team together is 2021 was to cut your ribbon in half (creates a thinner ribbon and releases some frays for that chabbier look) and how to tie a #tammybow

Tammy really is the queen of bows as you can see from her stunning projects.

I added one here underneath my sentiment which was created by combining 2 of the stamps from the Recency Park stamp set.

Along with my scrapbook page I also created some 3x3 cards and I forget how much fun they are!


I have also forgotten how much fun Mango Melody is—I think this color is having a moment along with Balmy Blue!

I used the new Cane Weave embossing folder on the base of my 3x3 card along with some coordinating DSP from the Regency Park 6x6 stack—and made a cute matching envelope!

The images on this card are from the Sentimental Park bundle! It is amazing!

This little mini card is made with a Balmy Blue base and I added a little strip of the Textured Shimmer Paper behind the first layer. The tag on the front is from the Sentimental Park dies and I just trimmed it down to fit this little card. I also hand cut out the words ‘YOU’ instead of just stamping it to the tag, just to add some interest and height. The Milky Dots are a great embellishment add on along with flowers from Petal Park.


I think of the 3 mini cards this one is my favorite. But I am partial to Petal Pink. It looks so good with the Night of Navy Bordered Ribbon (this ribbon is top notch).

I used another one of the labels from Sentimental Park and dressed it up with some images from both stamp sets and the DSP—you can see a Mango Melody flower at the bottom—I trimmed it right from the Recency Park paper. And I based everything on a panel of Petal Pink ran through the Cane Weave folder.

I love this whole suite! So much so that I am featuring it at my Spring Stamp Camp with my border buddy Hattie Nelson from Honeybee Stampers!

Our event is virtual on zoom—saturday, feb 25th. It includes a full package of the regency park dsp, 1/2 pkg of the textured 12x12 shimmer paper, milky dots and the full roll of ribbon—plus projects and demonstrations!

Hattie and I would love to have you at our event! I can ship kits anywhere in Canada! The event registration is $75 (plus extra if you need your kit shipped) and all the fun is shared in a private Facebook group! Try clicking this form to register! (I say try because this is something new!)

or you can touch base with me at stampsandstretchypants@gmail.com

Thank you so much!

I hope you enjoyed all of the projects shared by the team this first month of January! The Artisan Design Team is so excited to share in creativity with you all throughout 2023! Please come back every month to my blog and check Instagram to see all of the awesome projects we are sharing!

12 Days of Christmas--Day 12

For my final 12 Days of Christmas project I want to share a mini album with you. The cover of this mini album was actually one of my Artisan Design Team projects shared a couple months back. I decided to complete this album and offer it as a class! It is a pretty simple album idea that I have used repeatedly for different seasons and events!

The base of this album is an 8 1/2 x 11, cut in two pieces. I used 2 sheets to create this album and after it was all decorated I added two binder rings (found at any office supply store) with a variety of ribbons tied around the top ring. I have made several versions of this album, either designed to be horizontal (like this one) or vertical (to stand up on a shelf or table).

The base of this album is Smoky Slate which I thought was a nice neutral to pair up with the Santa Express Designer Series Paper.

I added a mix of patterns on the left side of the album along with a strip of Poppy Parade card stock to define an edge.

On the right side I stamped ‘Ho Ho Ho’ in Smoky Slate and added a DSP tag from the Santa Express paper along with the sentiments from the Santa’s Delivery stamp set. A bit of Iridescent Trim through the top completed the look of the tag. I used some of the Adhesive Backed Stars as a fun accent embellishment on the front as well.

This page is the inside of the cover. Now, do you ever have a boo boo? I do, I dropped an ink pad in the top left of this page and since I had already completed the front cover and didn’t want to start again, I just covered it with some DSP, hahaha! Sometimes you gotta do what you gotta do!

This album is pretty simple because I knew that I wanted kids in my studio to make it and my youngest stamper was 6! She did an amazing job. You can step up these pages if you like, but if not I think this is an all ages project.

Merry Christmas is cut from a retired punch and I added some Sweet Sorbet Bakers Twine and a Wonderful Snowflake behind it as an accent. The Mint Macaron scalloped border is from the Hand Penned Dies. I actually never put this die away, it just lives permanently on my magnet board beside my Stamp Cut & Emboss Machine.

I love the Joyful Flurry stamp set, especially when you can mount several stamps on a large block and stamp all at once, which is what I did for the boarder. I added a couple die cut snowflakes from the dies and the “let is snow” sentiment.

The next two pages feature the Spruced Up Dies and snowflakes once again. “Snowflake Wishes…” is a sentiment from the retired Snowflake Wishes stamp set/bundle. I will never part with it as I absolutely LOVE this sentiment!

And finally the last two pages in this easy mini album. Behind the “Falala" which is from the Framed & Festive stamp set, I added the other part of the trees from the Spruced Up Dies. I love how you get 2 trees cut at once with this set. Such a time saver and brilliant. I added more DSP and some Adhesive Backed Stars as well.

The “Ho Ho Ho” page is the last page in the book and the sentiment is from the Santa’s Delivery stamp set. I added some Basic White Bakers Twine behind the sentiment and on top of another Wonderful Snowflake.

I hope this quick and easy album inspires you to create your own! I have made them for all seasons and they are suitable for any age group!

I can’t wait to see what Melanie’s final project is today! THANK YOU SO MUCH for hopping along with us as we shared 12 Days of Christmas projects. I covered cards, treats, scrapbooking and a mini album within my 12 Days so I hope you enjoyed the variety—its the spice of life after all!


12 Days of Christmas--Day 10

Do you love to give out treats? I always make special thank you treats for my stamping friends and team members, especially around the holiday season. Recently, I got to go on a girls trip to Target visiting 7 different Target stores in Washington and Montana! haha! It was a lot of fun and I made sure to bring home some exclusive snacks to share!

I found these chocolate toffee pretzel rods at target and created a fun tag for them to add to my team members holiday bags!

Taking the time to make a cute tag is an easy way to jazz up a little treat or gift! I used some Sale a bration DSP that I had laying around in my scrap bin and paired it up with the Garden Green ribbon from the Real Red & Garden Green combo package in the holiday catalogue. The little tags are cute using the Tailor Made Tags Dies. A definite craft room must have!

The sentiment and stamped snowflake are from the Joyful Flurry stamp set and the die cut snowflake in Coastal Cabana is from the Celebrations Tags dies.

I also flicked Wink of Stella over top of my tag for a little bit of shimmer! Sometimes things don’t have to be uber fancy to surprise and delight people! Most people in our crafting circle will appreciate the fact that you took the time to make them something fun. I know I do!

Let’s see what Melanie has created for us today—after today we each only have 2 more projects to share with you!


12 Days of Christmas--Day 6

I am so excited to share this adorable mini bags with you today! I love love love to give little treats to people and after my recent Target trip I have so many fun options to give to people. I came across the template for these mini bags at sunnydaystamping.com, so I need to give her a shout out for her awesome tutorial!

I made these cute little bags at my recent team meeting and then made a bunch up to give to participants at a Christmas Card class I was hosting. They were the perfect little add on.

I decided to make these bags using the Sweetest Christmas DSP, you just need 2 pieces of 6x6 DSP. You could make these bags for any occasion and tuck a treat inside with a a gift card. In the video tutorial, sunnydaystamping.com, even added handles to the bags with some ribbon. There is so much potential with these!

I used the Handmade Christmas Bundle to decorate and embellish these cute little bags along with the Lasting Label Punch. I love to use our punches together with some Bakers Twine to create a larger sentiment label.

I used some of these retired treat bags to hold a handful of Hershey Nuggets that I wrapped with DSP. It is just an extra fun added touch. Some Garden Green ribbon around the bag was perfect and I love that it peeks out of the top of the bag.


The best part of our large DSP collection is all of the fun patterns to choose from. I love how this bag style does let you see both sides, so you might need to make sure that what you choose does work in this format.

The Handmade Wishes stamp set is the perfect set for those creative types that like to bake, make chocolates, buy chocolates, eat chocolates, give chocolates…haha! You get my drift. This label was made by combining 4 different stamps from the stamp set. I also couldn’t resist adding some of the mini hearts in the background too.

I really encourage you to try making these mini gift bags, they are quite simple and can be such a fun way to showcase our DSP for any little event that you need a cute bag!

I can’t wait to see what Melanie is sharing today! Click the image to hop over to her blog!