Around the World on Wednesday--Step it Up!

Welcome to another Around the World on Wednesday Blog Hop! This is literally the only way you can actually go ‘around the world’ in these fun and interesting times, hahaha! So I am happy to have you here!

I loved this months theme as its always a good challenge for me to try a fancier fold card style from time to time and that was how interpreted the theme of ‘step it up’! I can’t wait to see what all of the other gals from around the world design!

137064325_10218496422788728_249469279951355940_n.jpg

I wanted to play with the Sweet as a Peach stamp set as I haven’t had a chance to ink it up yet and I knew it would be a good option for the card style I had in mind. I had a request from a stamping friend to show her how to make a waterfall card and it worked out perfectly for this monthly challenge!

The Waterfall card style is an oldie but a goodie! And the best part is that is not complicated to make but look super fancy and is sure to get a ‘wow’ reaction from the recipient!

The Waterfall card style is an oldie but a goodie! And the best part is that is not complicated to make but look super fancy and is sure to get a ‘wow’ reaction from the recipient!

To create this style of card you need to choose a stamp set (or multiple sets) that has a lot of imagery and or sentiments for the 4 flip panels or the ‘waterfall’ aspect. I decided to use Sweet as a Peach because it has 12 words or sentiments in the stamp set and I wanted to layer up the peach and floral images with sentiments.

I decided to stick with the color palette of the You’re a Peach DSP therefore the base of my card is Crumb Cake with accents of Early Espresso.

To create the two tones of the peach I stamped it in Pale Papaya and then used my Blending Brush in Calypso Coral ink to add a deeper color straight to the stamp. Because these white squares are not that large, I used a couple of the leaves from the bottom of the big leaf stem on these peaches. The inside peach uses the larger leaf included in the set.

pictapgo-output 3.jpg

I also applied the same concept to stamp out the trio of flowers—stamping it in Pale Papaya first with the Calypso Coral added with a Blending Brush. I stamped all of the sentiments in Early Espresso ink.

On all 3 of the peaches I also added a bit of Wink of Stella for a little glimmer. Sadly it is really hard to photograph but looks really great IRL (in real life, yes I had to ask one of my kids once what that mean when they sent it in a text!!!).

final (4) 15.jpg

I added the polka dot pattern from the You’re a Peach DSP straight to the card base and added a few Champagne Rhinestones to the peach images.

pictapgo-output (2) 2.jpg

I punched a hole at the bottom of the waterfall piece to thread some of the new Pale Papaya & White ribbon through that I tied with a Linen Thread bow. This also helps the recipient know to pull on this piece when they receive their card.

And I also wanted to stamp the inside for a bit of extra fun!

 
91442295_10216484369808661_2887014979863576576_n.jpg

I hope this waterfall card design sparks an interest for you to try your own! I have included the instructions below and trust me, its easy!

pictapgo-output 5.jpg

To Create a Waterfall card:

Cut standard card base @ 81⁄2’ x 51⁄2” and standard mat @ 51⁄2" x 41⁄4”. Cut one “Anchor Strip” out of cardstock @1” X 4.” Cut one “Movable Strip” out of cardstock @ 2” x 9.” Cut 4 dark squares @ 2” and 4 whisper white (light) squares @ 13⁄4”.

  1. Lay the cardstock “Movable Strip” on scoreboard in landscape position and score this 4 times @ 2", 2 3⁄4", 3 1⁄2", and 4 1⁄4". Fold all score lines in the same direction and burnish with bone folder. 


  2. Apply adhesive to both ends of the “Anchor Strip” - only 1⁄2” on each side leaving centre part free. Attach this to the mat piece. Then add the mat piece to the card base front.

  3. Lay “Movable Strip” on card so that the folded parts are on top of the “Anchor Strip” and the unscored part is behind it. Adhere only the top end (1⁄2”) to the ‘Anchor Strip” This is so the parts can move freely. 


  4. Stamp images onto small white squares. Colour stamped images. Adhere to the 2” dark squares. Attach squares to the “movable strip” starting with the bottom one. NOTE- use only thin strip of adhesive along the top of each square for the top 3 squares - they need to be able to flex - fully attach the bottom square at top and bottom.

  5. Punch hole at bottom of under piece of the Movable Strip - then thread ribbon through and tie with a bow.

Thank you to my awesome friend Hetty for these directions! She is a library full of fun folds and is always willing to supply me with measurements when I need them! You can follow her on Instagram @stampin911hq!

Following me on the hop is Tricia Butts from the United States and if you didn’t know where in the world you are right now, I live in Edmonton, Alberta Canada! Please feel free to leave a comment and make sure to visit us again next month!


Dad--You're the Best!

This week I am going to be showcasing THREE awesome projects for the dads in your life! I wanted to share them early so you can use them for inspiration! So check back on Wednesday and Friday to catch all 3!

Up first is this awesome flip album that features pictures with Dad! You can use past photos or take some on Father’s Day to add to the album afterwards!

final 61.jpg

This is a fun Flip style album that I put together as a class. I always love to create a project that is kid friendly with a little help from mom.

Each page in the album is HALF of an 8 1/2 x 11 piece of Crumb Cake card stock. I used a total of 3 half sheets to make this which will give you 6 design surfaces or sides. You will need to stack them together and punch a hole to add the binder rings (available at any office supply store).

I used the Well Suited DSP as my color palette. I actually quite like this masculine themed designer paper! I cut ‘Dad’ using some retired alphabet dies as I never get rid of our alphabet offerings. I actually wish we would bring back a larger set again! Because I am an avid scrapbooker I do pull these out quick often. The Balmy Blue heart is from the Kiss Punch. Let’s Celebrate You can be found in the stamp set Itty Bitty Birthdays.

final (1) 33.jpg

Each page is designed to add a vertical 4 x 6 photo (the ‘selfie’ direction of most of our pictures). I added a photo mat on each page as well and then a few fun details. This page uses sentiments from the Thanks for the Laughs and Handsomely Suited stamp sets. The main sentiment is die cut using the Stitched So Sweetly dies.

final (1) 34.jpg

I also added in the Playful Alphabets dies with the Foam Adhesive Sheets (best combo ever!) and the sentiment on this page is from A Good Man and is a repeating sentiment throughout the album.

final 62.jpg

I am a big fan of our twine as it adds such a nice accent behind sentiments and I love that there is coordinating twine with this suite. I wanted to bring in a lighter touch to this page so I added hints of Balmy Blue with the top sentiment and by tucking a half circle under the bottom one.

The “You’re the Best” is from the A Good Man stamp set and the bottom one is from Handsomely Suited.

final 63.jpg

I thought adding in a the sentiment “We must be Related” was perfect for a page with a dad and his kid! I love the Grand Kid stamp set and am so happy it carried over into our new catalogue. It should not be overlooked, it has some awesome sentiments in it. Some retired twine also worked well along with our Matte Black dots. So happy they are sticking around too!

final 60.jpg

And of course we need to finish off this album with “You are Amazing” as Dad really is right? I love this sentiment and you can find it in the You are Amazing stamp set that coordinates with the project kit. I added a strip of DSP and some black twine from our twine combo package and some recently retired ribbon.

I love this little Flip album as it stands up fairly easy and makes a fun addition to Dad’s desk! Make sure to come back and visit on Wednesday so you can see the next project I created!

Create with Connie and Mary--Favorite NEW Catalogue Bundle!

21SUDesignTeam.png

So to end this month of new ‘favorites’ we had to design something with our favorite new bundle! Well the one that I have created with the most would have to be the Hand-Penned Petals suite! I just love the whole collection. I created a really fabulous project to share with my team and I thought it was the perfect project to end this month of ‘favorites’! I hope you are inspired!

final 51.jpg

I can’t believe in my 15 years of Stampin’ I have never created a card folio before! I designed this one to hold two cards on either side of the folio. There is enough space that you could also include envelopes. The color palette of the project is based off of the Hand-Penned Designer Series Paper which I am in love with. I have always been a fan of pastels, in fact, when I got married my 5 bridesmaids wore pastel pink, yellow, blue, green, and purple!

I added the inside sentiment from the Pansy Patch stamp set

I added the inside sentiment from the Pansy Patch stamp set

I can’t wait to see what all of the other Design Team members have selected as their favorites! You can go BACK to see what Melissa is loving or you can go NEXT to see what Connie has selected!

Around the World On Wednesday--Fancy Folds!

Welcome friends! So happy to be back with this crew this month, especially because our design theme is ‘Fancy Folds’ and I always love the challenge of creating one! While my design skills might be strong, math is not my forte! So while the ‘Fancy Fold’ looks amazing, it is not complicated and is something that can be replicated!

91442295_10216484369808661_2887014979863576576_n.jpg

As soon as I saw the Pansy Patch Bundle and coordinating Pansy Petals DSP I knew I wanted to try making a Pop Up Box card again. It has been a while but I was familiar with this card style and I could envision a bunch of flowers popping out of a box. You could recreate this project using any of our amazing flower dies.

final 28.jpg

What made this project extra awesome was that I was able to cut all of the flowers from the Designer Series Paper with the coordinating dies! I love when Stampin’ Up! developes amazing product coordination!

The sentiment is stamped in Calypso Coral ink from the Pansy Patch stamp set and punched into a 2 inch circle.

final 26.jpg

What makes this Pop Up Box card so great is that it folds or squishes flat so you can send it in an envelope. When the recipient opens it it will pop open into the box shape. It is also a really adorable project to have on display in your craft room. And, extra bonus, you can make two cards from one 8 1/2 x 11 piece of card stock.

final 29.jpg
 

To create the Pop Up Box card cut your card stock to 4 1/4 x 8 1/2. Score on the long side at 2, 4, 6 and 8. On the short side score at 2 1/4. On the 2 inch side, trim away a small portion from the 1/2 inch section to create a flap. This is how your will seal the box shut.

You can see from this angle there is no bottom to this project.

The flaps can be decorated. I decided to add a layer of Crumb Cake card stock to the two side flaps that I ran through the Dots folder from the Checks & Dots set.

final 32.jpg

As you can see the back ‘flap’ is not folded, you leave it standing straight to create a back to the project. I added some DSP from the Pansy Petals to this back panel measuring just under 2 inches by 3 inches.

On the bottom of the box I also added the same DSP.

Now let’s talk about the inside! To anchor the pansies you will need two things—Window Sheets, cut into teeny tiny strips and two pieces of coordinating card stock, in this case, Crumb Cake, cut to .5 x 3 inches scored on each end at .5. You will then use Glue Dots to anchor each little tab to the inside of the box.

The strips of Window Sheet are used to attach to these card stock anchors and the flowers. You can cut them to different heights to create a floral arrangement.

final 31.jpg

I hope this project inspires you to try creating your own Pop Up Box card. You can search Pinterest for inspiration or a visual for the directions, there is a lot out there!

Next up is Tricia Butts, I can’t wait to see what she has designed as a ‘Fancy Fold’ for us this month!


Hey Chick!

Hello friends! This month the Artisan Design Team is sharing projects that feature the Hey Chick and Hey Birthday Chick bundles, the Sand & Sea suite and the Cactus Medley with the Succulent bundle! My assignment was to create some fun projects featuring the CHICKENS! Such a fun and cute couple of sets to work with!

2021_BLOG_BADGE.jpg

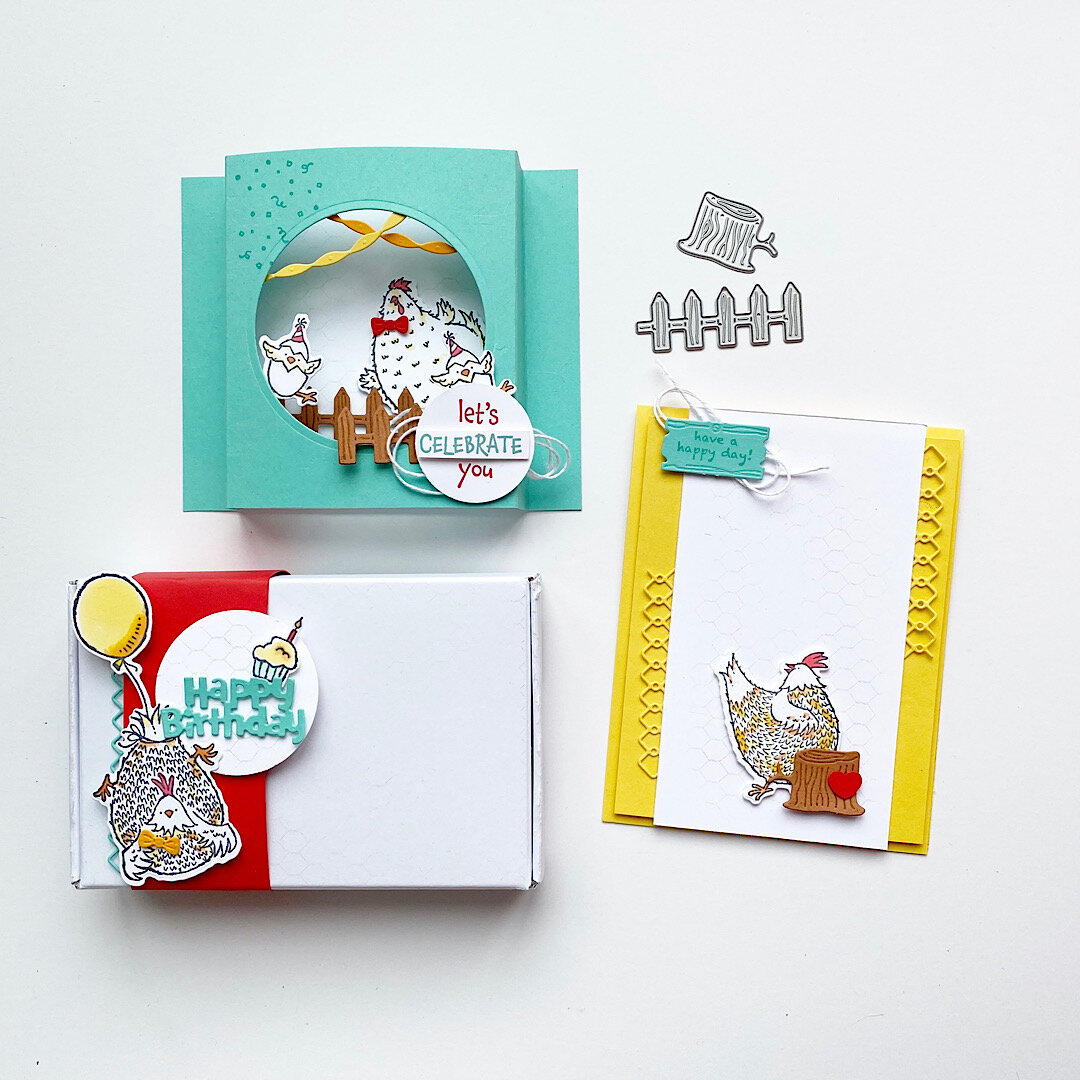
As soon as I saw the big chubby chicken and the little chicks I knew I wanted to showcase them with a Diorama Card! This is such a unique card style to showcase a ‘scene’ and its a throwback to those fun shoebox diorama projects I loved make as a kid for a school project.

IMG_3494.jpg

To recreate these projects you will need some Stampin’ Blends to add a hint of color to your chickens. The secret weapon and fun tip with this project is to take the wood stump die and the fence die and add extra details and dimensions to them by pressing them into the Cinnamon Cider ink pad prior to running them through the Stampin’ Cut & Emboss Machine. The ink on the die will press into the card stock and transfer, giving the recessed area some ink detail!

I also used the Wired Up background stamp set with my projects. I inked it up, keeping it right in the stamp case, with Grey Granite and then lightly touched my surfaces to the stamp. By not fully pressing it I was able to just add the chicken wire detail in a few places. Its a faint but awesome detail.

I think the bright colors of Poppy Parade, Coastal Cabana, and Daffodil Delight really added to the whimsical feel of these projects. I was really happy with how cheery and fun the finished projects turned out!

I think the bright colors of Poppy Parade, Coastal Cabana, and Daffodil Delight really added to the whimsical feel of these projects. I was really happy with how cheery and fun the finished projects turned out!

The Daffodil Delight card is a traditional card fold. I added die cut chicken wire poking out from each side of the main panel for a fun detail. The sentiment in Coastal Cabana at the top of the card is the sign trimmed to look like a board instead of a sign post. I always look for ways to change how a die works and this was easy! I added a light coloring detail to the chicken on this card with Poppy Parade, Daffodil Delight and Mango Melody Stampin’ Blends.

IMG_3580.jpg

To create the Diorama card you will need a large die to cut the window in the front. I used the largest circle die from the Circles Dies in the Annual Catalogue (a crafters must have set!).

The base of the Diorama card is 6 3/4 x 4 1/2. You want to score this at 3/4, 1 1/2, 5 1/4 and 6. You want to peek and valley fold these score lines to create the raised up front area.

The Basic White background piece is lightly stamped with the Chicken Wire background stamp and measures 4 1/4 x 4 1/2. You can attach this and then piece in the chubby bowtie chicken and fence. I found this was easier as I knew exactly where to place it instead of adding it to the Basic White first.

I then added a Coastal Cabana back piece to the card which measures the same as the Basic White, 4 1/4 x 4 1/2. This also gives the card a bit of weight and makes it easier to stand up.

The little chick on the left hand side is attached with a Glue Dot on his one leg. This gives him the illusion of popping out. The two streamers are cut in Pumpkin Pie and Mango Melody card stock and are attached to the inside of the window. This also contributes to the diorama style and feel.

IMG_3579.jpg

I finally I just love the belly band on the Mini Paper Pumpkin box. I just love these boxes. They are the perfect size for giving Gift Cards and little treats and fit our Basic White Notecards perfectly!

I created the Poppy Parade belly band to be 2 inches wide and stamped ‘Hey Chick’ in the coordinating ink randomly along the band. I used the chicken wire die again, this time in Coastal Cabana cards stock to add a bit of detail. The chicken with the balloon is colored with Stampin’ Blends and I couldn’t resist giving him a little bowtie! I love that the Birthday Chick dies have a die that cuts Happy Birthday! It was a fantastic addition to this project with the little cupcake trimmed from the Hey Chick stamp set.

If any of these projects have inspired you and you live in Canada, please consider shopping with me. I would love to get to know you and help in your creative stamping journey! I teach a lot of classes and facilitate a number of monthly groups!